Author email |
|
PyMoDAQ version |
4.4 |
Operating system |
Ubuntu 24.04 |
Last update |
January 2025 |
Difficulty |
Intermediate |
4.1. Read voltages on Ubuntu with Arduino
In this example of use, we will present how to read an analog input of an Arduino board with PyMoDAQ installed on Ubuntu.
This example may be among the cheapest ways to test PyMoDAQ with an actual detector, as the only expenses are an Arduino Uno R3 board (30€) and a TMP36 sensor (1€), software included! It will also be the opportunity to present some particularities related to the use of an operating system based on Linux.
4.1.1. Prerequisite
4.1.2. What we will learn
Run an AppImage file
Manage USB ports with Ubuntu
Communicate with an Arduino board with Python and PyMoDAQ
Modify an existing plugin to make it suits our particular needs
4.1.3. Install the Arduino IDE 2
The Arduino IDE is a GUI software that should be installed on our operating system to communicate with the board. We follow the instructions from this page.
Let’s download the .AppImage file, which is equivalent to a .exe file on Windows.
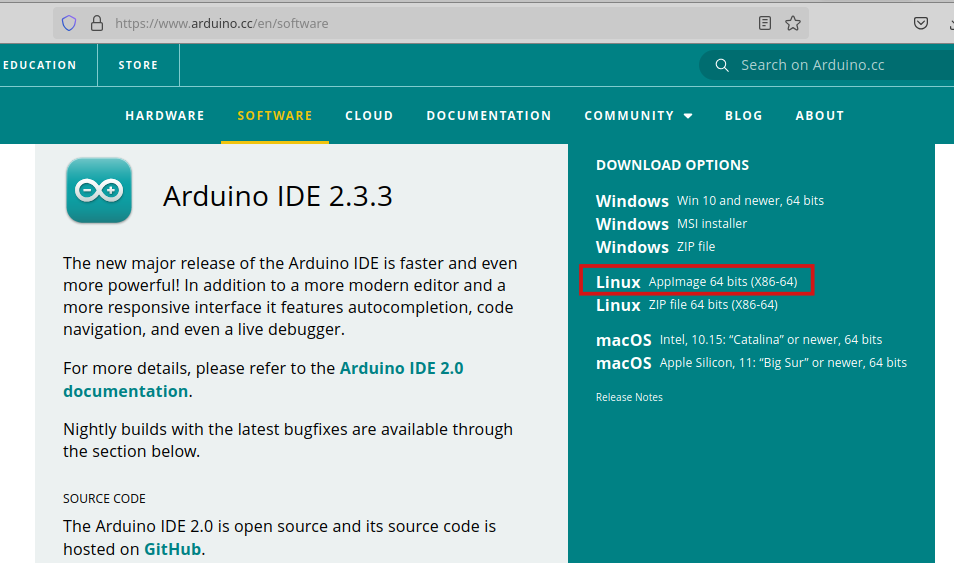
Fig. 4.1 Download the .AppImage file.
Once it is downloaded, right-click on the file, go to Properties > Permissions and tick Allow executing as a file. This file can be placed wherever we like, we just need to double-click on it to launch the Arduino IDE.
4.1.4. Connect our Arduino to the computer
Let’s connect our board on a USB port of the computer. Open a terminal and run the lsusb command, which will display the devices that are connected on USB ports. This is the Linux equivalent to the Devices settings on Windows.
Note
The name of this command can be decomposed as “ls”+”usb”. The ls Bash command being used to see inside a folder. Here it means “let me see the USB ports”. This article details different ways to list the USB devices connected to a Linux system.
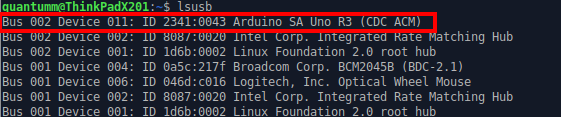
Fig. 4.2 Output of the lsusb command.
This way we have checked that our board is properly connected.
In the Arduino IDE menu, go to Tools > Board and select the correct model.
Go to Tools > Port and select the one that is proposed. It should be something like /dev/ttyACM0 (Arduino Uno).
Note
If the Tools > Port menu is still empty at this stage, we may need to restart the IDE.
Note
COM ports do not exist on a Linux system. Instead, once a USB port is connected, a file is created inside the /dev folder, and the port name starts with /dev/tty….
4.1.5. Make our circuit
We mainly follow the LOVE-O-METER project of the Arduino projects book.
We build the following circuit, without the LEDs part that is inside the red rectangle. We just want to read the temperature of the TMP sensor, so we just bring him a 5V voltage, and connect its output (its central pin) to the A0 analog input of the board. All the details should be found into the Arduino projects book.
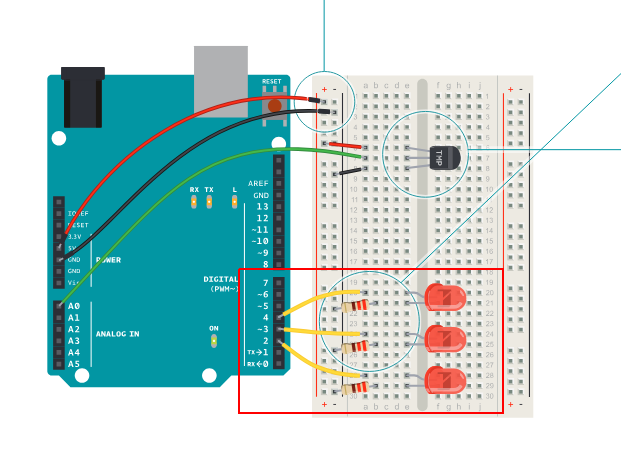
Fig. 4.3 Circuit of the Arduino board. The circuit inside the red rectangle is not used here.
4.1.6. Read the board with an Arduino sketch
A sketch is a script in the Arduino language to execute some commands on the board.
Let’s try to upload the following sketch to the board by pressing the play button.
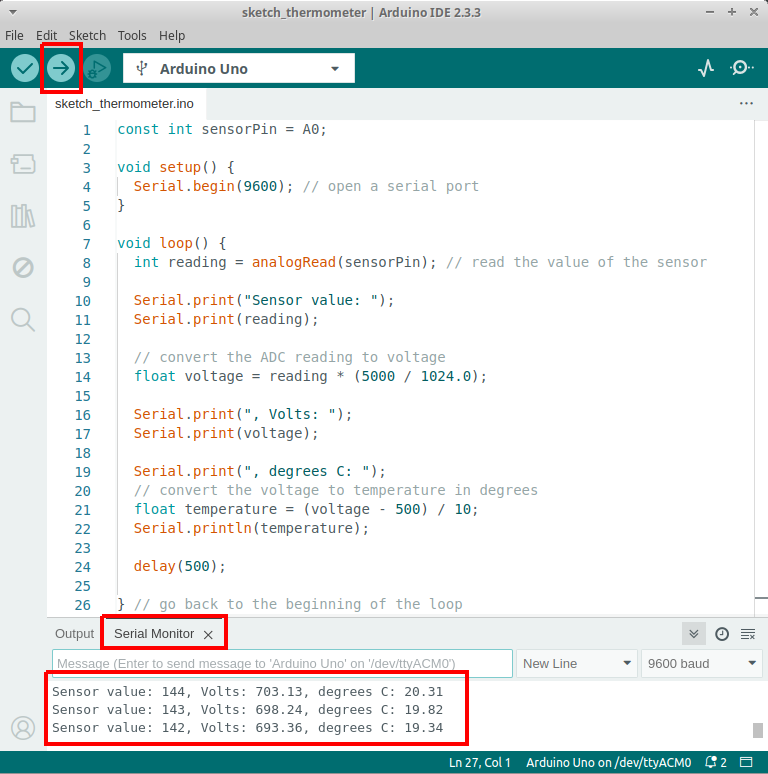
Fig. 4.4 Reading of the TMP temperature with the Arduino IDE.
Once the upload is done, we can go to Tools > Serial monitor. It will display a new tab at the bottom of the window, where we can read the temperature. We can check that it is not fake by pressing a finger on the TMP chip to raise the temperature.
It is probable that at the first try of uploading the sketch, we get an error saying that permission is denied on the /dev/ttyACM0 file. To get rid of this error, we need to give the proper rights so that the Arduino IDE will be authorized to write into it. For that we can enter in a terminal the following command
sudo chmod a+rw /dev/ttyACM0
Note
It seems like the /dev/ttyACM0 file is deleted each time we unplug the port, or shut down the computer. In those cases the command should be run again.
4.1.7. Read the board with Python
As we already noticed, the Arduino sketches are not natively written in Python. We will first have to make the translation thanks to a library called Telemetrix, so that we can talk to the board with Python.
The communication is done in a client-server architecture: the server is the Arduino board, the client is our computer. The installation of Telemetrix then goes into two steps: the upload of the Telemetrix4Arduino server to the board, which is done like any other sketch. And secondly, the installation of the Python package telemetrix in our environment.
4.1.7.1. Install the Telemetrix4Arduino server
We will follow the installation instructions of the server.
We first need to install the Arduino library Telemetrix4Arduino. Let’s go to the library manager of the Arduino IDE, search “Telelmetrix” and install Telemetrix4Arduino.
Secondly, we need to upload a sketch. Still on the Arduino IDE, go to File > Examples > Telemetrix4Arduino > Telemetrix4Arduino and upload the sketch to the board. That’s it!
Note
It happens while writing this tutorial that the board was giving a good temperature with the Arduino IDE, but output crazy values while using a Python script. In that case, it may be useful to upload again the Telemetrix4Arduino server to the board.
4.1.7.2. Install the telemetrix Python package
We suppose that we already installed Python, created and activated an environment called arduino_ubuntu by following the installation instructions. Be careful to follow the the specific instructions for Ubuntu.
We install telemetrix in our environment with pip in a terminal:
(arduino_ubuntu) pip install telemetrix
4.1.7.3. Read the temperature with a Python script
We are now ready to read the temperature with a Python script! We will not start from scratch but rather use the example script called analog_input_scan_interval.py available in the examples of the library.
Let’s download it, and open it with an editor. We will make the following modifications of the file:
line 35: ANALOG_PIN = 0. Because we are reading the A0 analog input pin of the board.
line 70: my_board.set_pin_mode_analog_input(pin, 0, the_callback). As is written in the comments above, the second parameter of the function set_pin_mode_analog_input check the differential values output. We put it to zero so that we have a regular output in time.
line 71: my_board.set_analog_scan_interval(255). It decreases the output frequency.
Let’s save it, and run it in our arduino_ubuntu environment:
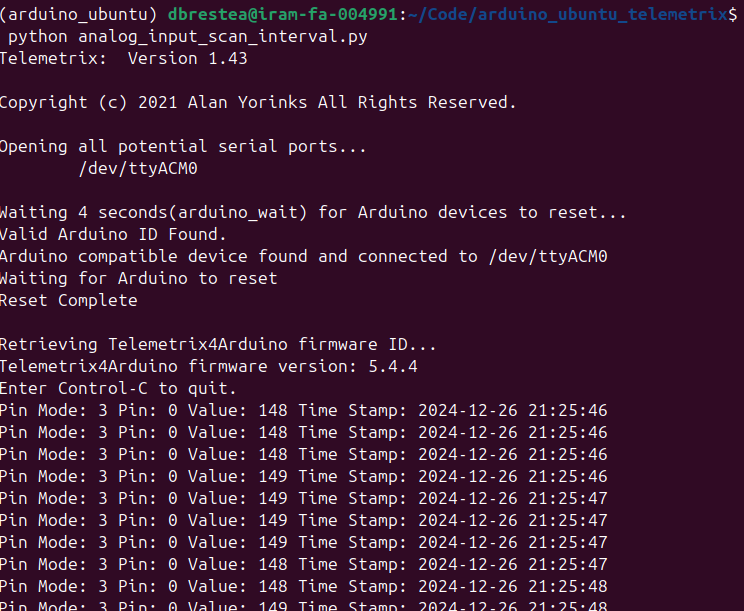
Fig. 4.5 Output of the analog_input_scan_interval.py script. We saved the script in a directory ~/Code/arduino_ubuntu_telemetrix, but it could have been saved anywhere else.
If we plug directly the - pin (0 Volt) of the board to the A0 pin, it indicates a value of 0. If we plug directly the + pin of the board (+ 5 Volt), it indicates a value of 1023. The analog to digital converter (ADC) of the board should use 10 bits (2¹⁰ = 1024) to digitalize the input voltage. Therefore the conversion formula to get the voltage should be voltage[mV] = 5000/1023 x value.
Following the instructions detailed in the Arduino projects book, we get from the documentation of the TMP chip, that the formula to convert the output voltage into a temperature is
temperature[°C] = (voltage[mV] - 500)/10 = 500/1023 x value - 50.
To get the reading in Celsius degree, we have to replace in the method the_callback, in the print function Value: {data[CB_VALUE]} by Value: {500*data[CB_VALUE]/1023 - 50}.
We now get the output in Celsius degree!
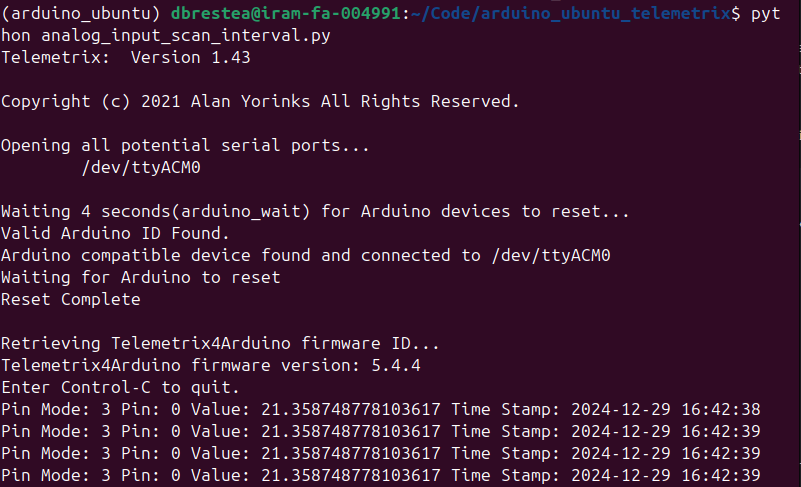
Fig. 4.6 Output of the modified script in Celsius degree.
4.1.8. Read the board with PyMoDAQ
Now that we know how to read the temperature with a Python script, we are close to be able to read it with Pymodaq.
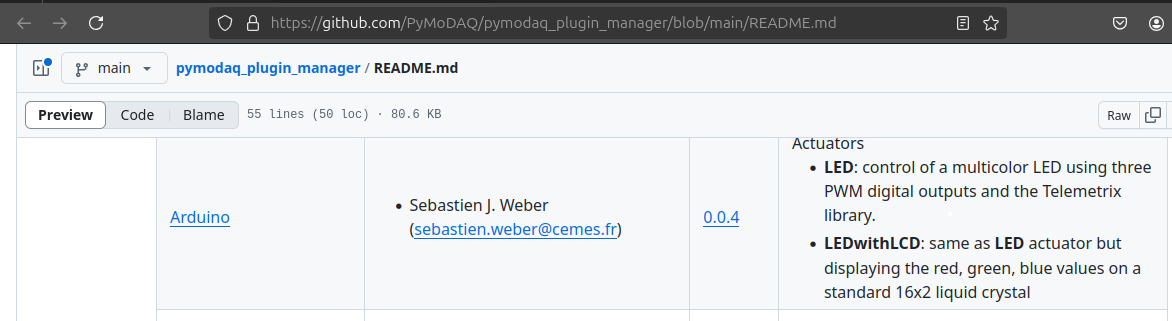
Let’s have a look at the list of readily supported instruments. We are lucky, the Arduino plugin already exists!
4.1.8.1. Install PyMoDAQ and the Arduino plugin
Let’s start by installing PyMoDAQ in our environment
(arduino_ubuntu) $ pip install pymodaq pyqt5
Note
Version 4.4 at the time of writing.
And install the Arduino plugin
(arduino_ubuntu) $ pip install pymodaq_plugins_arduino
4.1.8.2. Configure the viewer and launch the acquisition
Let’s launch a viewer
(arduino_ubuntu) $ daq_viewer
and follow the sequence:
Open the control menu
Open the settings menu
Select DAQ0D
Select Analog as the detector
Select the port ASRL/dev/ttyACM0::INSTR
Activate the analog input channel AI0
Initialize the detector
Launch the acquisition

Fig. 4.7 Acquisition of the AI0 analog input channel of the Arduino board. The raise in temperature happened after we pressed the TMP sensor with our fingers.
It works! :D
4.1.8.3. Get the reading as a temperature in Celsius degree: modify an existing PyMoDAQ plugin
We notice that for now, the reading of the viewer is not in Celsius degree. To do so, we will have to adapt the existing Arduino plugin to our need and modify its code. This section is therefore a bit more advanced and requires that we have a GitHub account and know how to modify a code hosted on GitHub.
We use the following procedure:
Fork the pymodaq_plugins_arduino repository in our GitHub account.
Clone our remote repository to our local machine.
Create and checkout to a new branch of the clone.
Make an editable install in our arduino_ubuntu environment with the pip install -e <path to the root of the local repository> command.
Once all those steps are completed, we modify the code inside the grab_data method of the DAQ_0DViewer_Analog class, as in the following figure: the commented lines (172 and 173) are replaced by the above lines (170 and 171) to get the temperature from the raw value.
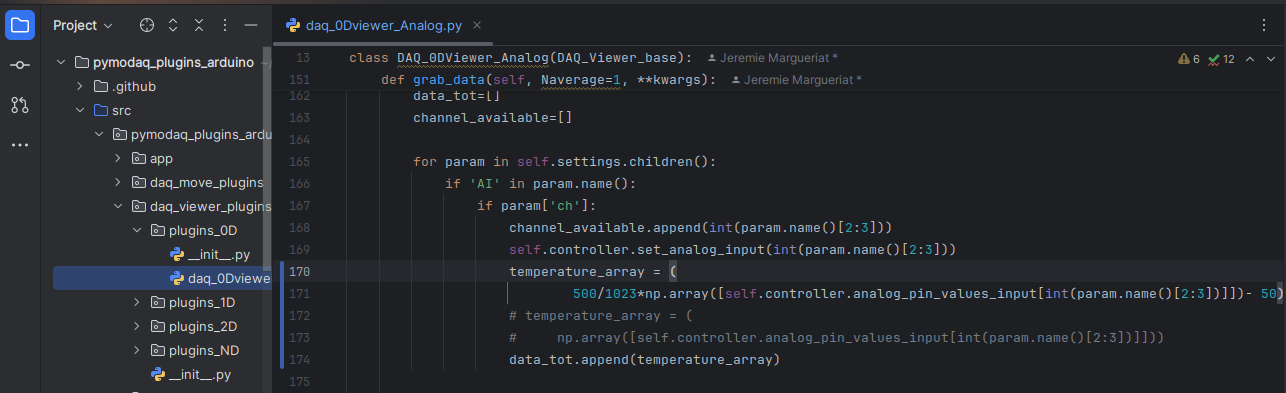
Fig. 4.8 Modification of the Arduino plugin to get the temperature in Celsius degree.
Here is the result:
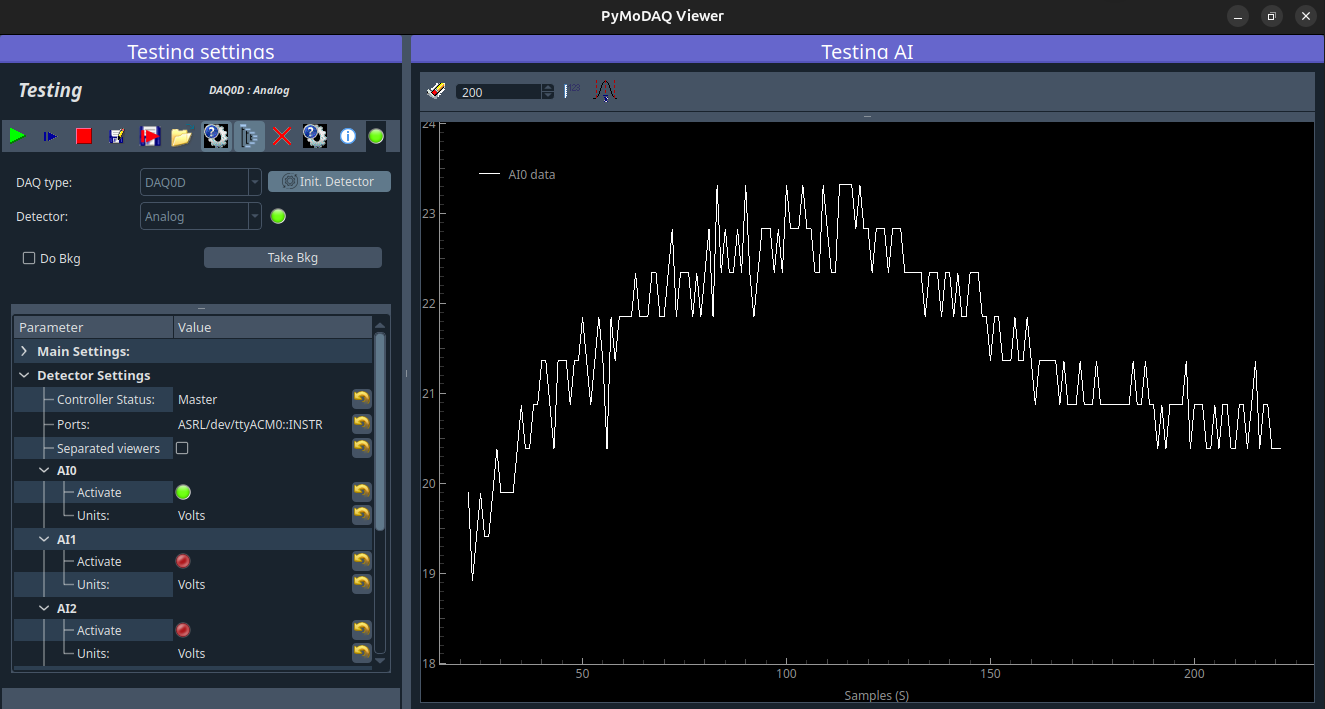
Fig. 4.9 The viewer now displays a value in Celsius degree!
It works, we now have a reading in Celsius degree! Since we are happy with this modification, we commit and push it towards our remote repository.
Note
The login to our GitHub account, which is necessary to push, is quite easy with the generation of a token, which is directly proposed by PyCharm.
An important point is that now our new version of the plugin can be installed very easily in any other environment on any other machine with the following command:
(any environment) $ pip install git+https://github.com/<GitHub account>/<repository name>.git@<branch name>
Note
This is called an installation from source, which means directly from the code on GitHub. As compared to the installation of a release from PyPI.
Using this procedure, we understand that we can easily reuse any code that is stored on our GitHub account on any other machine.
4.1.9. Conclusion
With this example, we learnt the basic use of PyMoDAQ on Ubuntu.
If we wish to control any other instrument on Ubuntu, let’s be careful at the moment of purchasing the device that the supplier provides Linux compatible drivers. (If it can also provide an open-source Python wrapper that would be even better!)
When the PyMoDAQ 5 version will be released, the last section of this story should be simplified thanks to the data mixer extension.
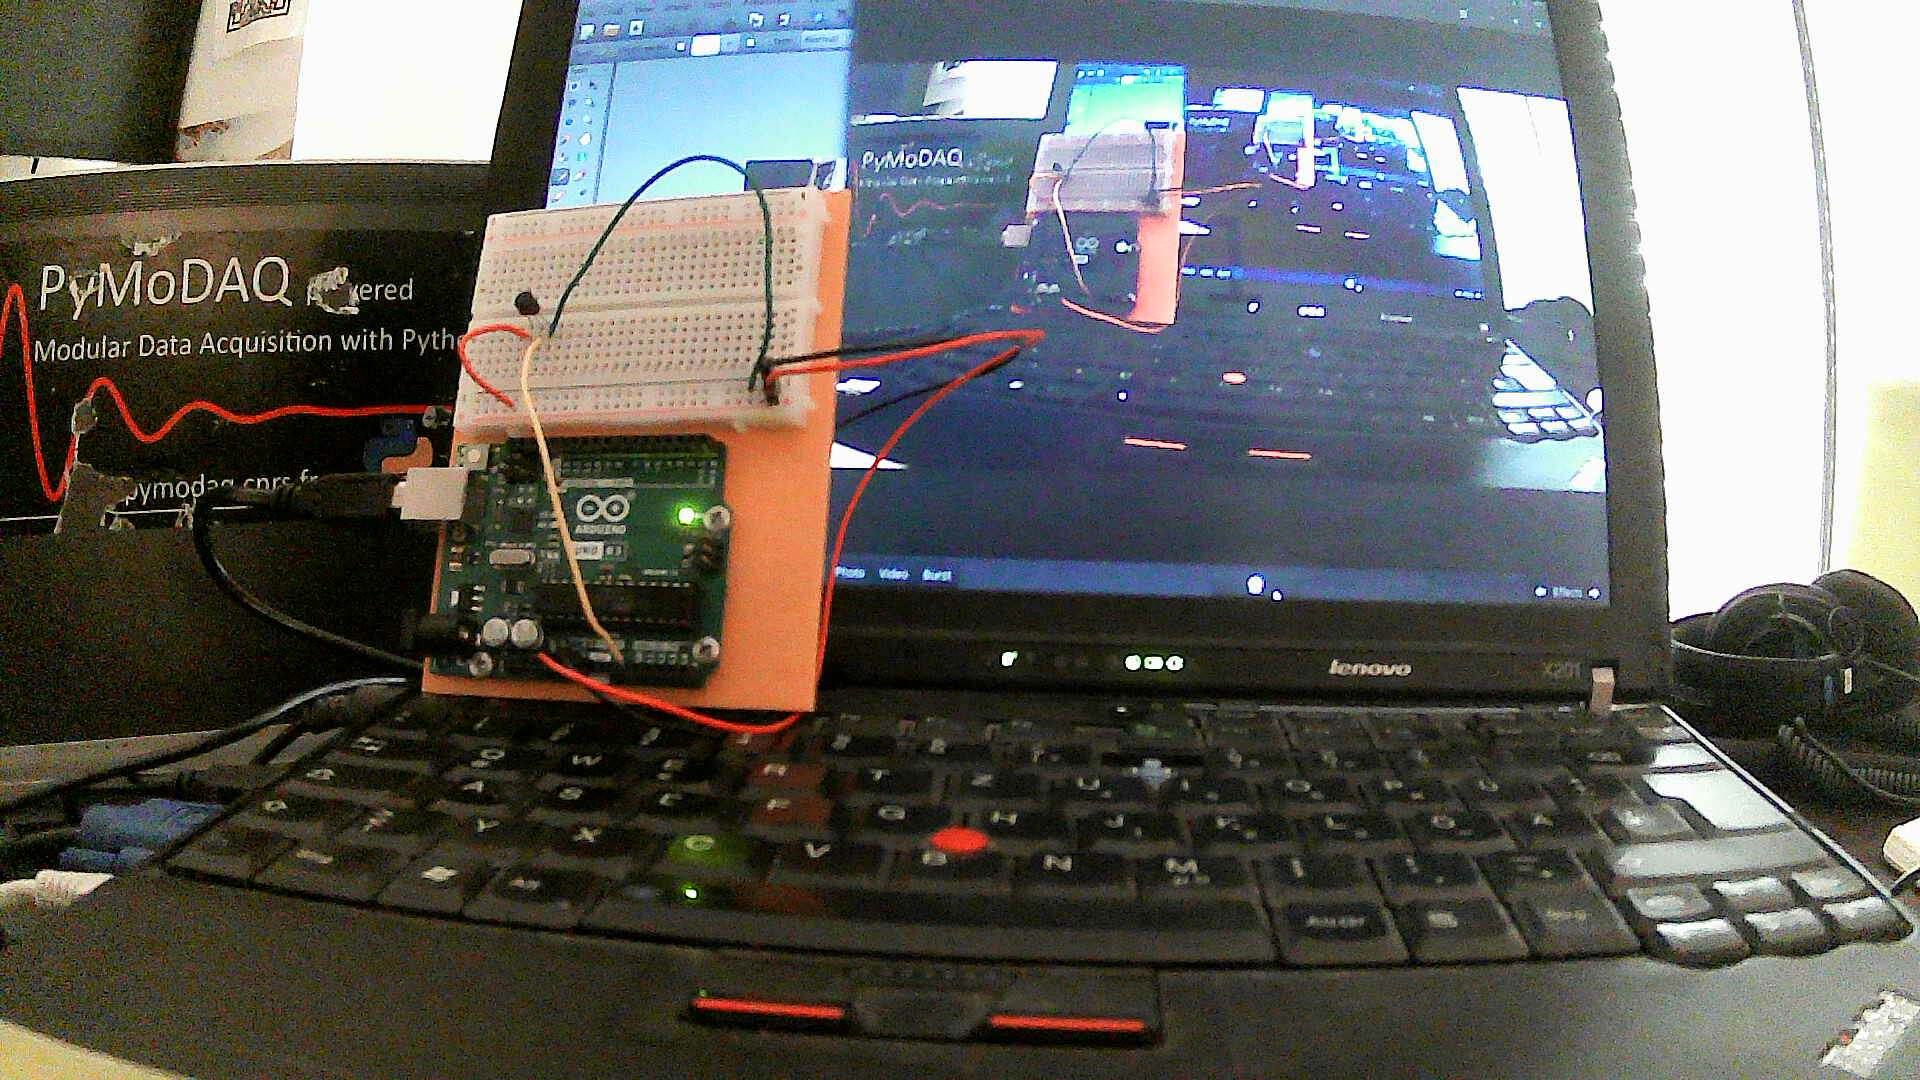
Fig. 4.10 The Laughing Cow!